
I’ve transformed countless kitchens using spray painting techniques that deliver factory-quality finishes without the professional price tag. The key lies in mastering specific equipment configurations, understanding paint viscosity ratios, and executing precise application patterns that eliminate brush marks and roller texture. Most DIYers fail because they skip critical preparation steps or use inadequate spray systems. Once you understand the proper sequence of surface prep, primer selection, and spray gun settings, you’ll achieve results that rival custom cabinet shops—but there’s a methodology that separates amateur attempts from professional outcomes.
Key Takeaways
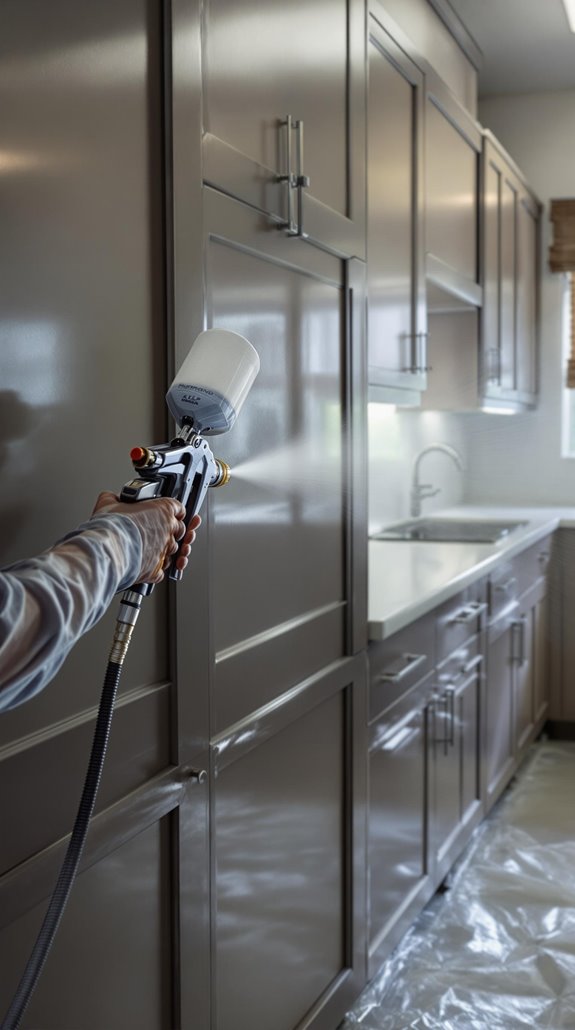
- Use HVLP sprayers with thinned paint (80% paint, 20% water) and maintain 6-inch distance for smooth, professional application.
- Thoroughly degrease, sand with 120-180 grit sandpaper, and apply bonding primer before topcoat for optimal adhesion.
- Create a controlled workspace with proper ventilation, temperature 50-85°F, and humidity below 50% for consistent results.
- Apply thin, even coats using systematic spraying sequence: edges first, then back surface, followed by front surfaces.
- Allow 24-48 hours drying time and full 5-day curing period before reassembly to achieve maximum durability.
Essential Tools and Materials for Cabinet Spray Painting
Five essential tool categories will determine the success of your cabinet spray painting project. I’ll walk you through each category that separates amateur results from professional finishes.
Paint Sprayers form your foundation. The Wagner Flexio 5000 delivers excellent topcoat application, while HVLP units like the Wagner Control Spray Max offer adjustable patterns for beginners. Airless sprayers such as the Graco Magnum X5 provide that coveted smooth finish.
Thinning Materials guarantee proper flow. I mix latex paint at 80% paint to 20% water for peak spray consistency.
Protection Equipment includes painter’s tape, plastic sheeting, and drop cloths to contain overspray. These materials prevent accidental overspray on surrounding surfaces and maintain clean work areas.
Support Tools like tripods and drying racks keep doors elevated during spraying.
Detail Brushes handle touch-ups where sprayers can’t reach effectively.
Proper Surface Preparation and Cleaning Techniques
Having your tools ready means nothing without properly prepared surfaces that accept spray paint uniformly. I’ll start by removing all cabinet contents and detaching doors, drawers, and hardware using appropriate tools. I systematically label components and store screws securely to prevent loss during reassembly.
Next, I wipe surfaces with damp cloths, then apply TSP solution for deep degreasing of kitchen residues. I use microfiber cloths to avoid lint and allow complete air-drying before sanding. It’s also crucial to ensure that any modifications to your kitchen comply with approved planning permissions to avoid potential legal issues.
I sand with 120-180 grit sandpaper parallel to wood grain, using random orbital sanders on flat panels. After vacuuming with brush attachments, I wipe with tack cloths to eliminate residual dust. Finally, I examine surfaces under angled lighting, filling imperfections with wood putty and confirming that matte, chalky appearance across all areas.
Throughout the preparation process, I ensure proper ventilation by running exhaust fans and opening windows, as adequate airflow is essential for safety and helps surfaces dry more effectively between cleaning and sanding steps.
Setting Up Your Workspace for Professional Results
Since professional spray painting results depend heavily on environmental control, I’ll establish a dedicated workspace that manages airflow, contains overspray, and maintains ideal conditions. I’ll select a well-ventilated garage or outdoor area, installing exhaust fans to maintain continuous airflow while monitoring temperature between 50-85°F and humidity below 50%. Furthermore, ensuring early detection of issues is crucial to prevent costly mistakes during the painting process.
Next, I’ll enclose the workspace with plastic sheeting and cover floors with canvas drop cloths—never plastic due to slip hazards. I’ll mask nearby surfaces with rosin paper and seal HVAC vents completely.
For organization, I’ll label each cabinet component and designate separate zones: cleaning, priming, painting, and drying. I’ll install 5000K LED work lights at 45° angles for shadow-free inspection and position my compressor outside to reduce noise distractions. Creating a paint booth is essential to contain dust and overspray during the painting process.
Mastering Primer Application and Surface Smoothing
With my workspace properly configured, I’ll focus on the primer application process that determines whether my final finish looks professional or amateur. I start by removing doors, drawers, and hardware, then clean all surfaces thoroughly before sanding with 180-grit paper to create proper adhesion. I use bonding primer with my airless sprayer, maintaining consistent 6-8 inch distance while applying thin, even coats. For detailed areas, I switch to foam rollers and brushes to catch every groove and edge.
After spraying, I hang doors using pilot holes to prevent surface contact during drying. Once dry, I inspect from multiple angles, touching up any missed spots. The primed surface must be completely smooth and dust-free before topcoating—this foundation step separates amateur work from professional results. Additionally, considering building regulations is essential to ensure that all aspects of the renovation comply with local standards. I always apply two to three coats of primer and allow each to dry completely for maximum coverage and durability.
Advanced Spraying Techniques for Even Coverage
Once the primer has cured completely, I’ll execute a systematic spraying sequence that guarantees uniform coverage across every cabinet surface. I start by spraying all four edges of each door, then apply a wet coat to the back surface before flipping to prime the front and remaining edges.
My equipment settings are essential for success. I set sprayer pressure to high for primer application and thin topcoat paint to 80% paint, 20% water for ideal flow. I maintain a consistent 6-inch distance while using sweeping motions, working within comfortable reach to avoid overextending.
For edges and corners, I angle the gun so two-to-three passes blend at center. I spray corners first, then fill center areas. Light sanding with 150-180 grit sponge between coats removes bounce back, ensuring that professional finish we’re after. This systematic approach provides a cost-effective alternative to complete kitchen renovation while achieving professional-quality results.
Between-Coat Sanding and Quality Control
After each coat reaches full cure, I execute a meticulous between-coat sanding process that eliminates surface imperfections and creates the mechanical bond necessary for professional-grade adhesion. I use 220-400 grit sandpaper with sanding blocks, applying light circular motions to avoid penetrating existing layers. My LED work lights reveal every dust nib and drip through angled illumination. Additionally, thorough planning for renovations helps ensure that painting projects like this stay on budget and achieve the desired finish.
I prioritize flat surfaces first, then tackle edges while maintaining uniform abrasion. After sanding, I vacuum all residue and wipe surfaces with damp cloths followed by tack cloths. For the final coat preparation, I switch to soft brown paper bags which provide the ideal texture for achieving an ultra-smooth surface. My quality control demands tactile smoothness—no detectable ridges when gliding fingertips across surfaces. I conduct visual inspections under 45-degree lighting, confirming zero visible scratches and dust-free surfaces before recoating.
Equipment Care and Maintenance Best Practices
Since professional spray painting results depend entirely on equipment performance, I’ve developed a systematic maintenance protocol that extends tool life and guarantees consistent coating quality.
I flush my spray gun immediately after each session with appropriate solvent, then disassemble and clean every component—nozzle, needle, and fluid passages. This prevents paint buildup that destroys finish quality.
My safety gear gets thorough cleaning between projects. I wash reusable masks and goggles with mild soap, replacing filters according to manufacturer specs. Proper storage in dust-free containers maintains their protective integrity.
I clean my random orbital sander meticulously, removing all dust particles and replacing worn pads. The ventilation fan requires regular blade cleaning to maintain peak airflow.
Everything gets organized storage in climate-controlled conditions. This systematic approach guarantees every tool performs flawlessly when precision matters most. Regular maintenance of HVLP sprayers ensures they continue delivering the smooth, even application that produces professional-quality cabinet finishes.
Curing Timeline and Professional Reassembly Tips
While proper coating application sets the foundation for professional results, the curing phase determines whether your spray-painted cabinets achieve their full durability potential. I recommend allowing 24-48 hours minimum drying time after your final coat, though you’ll want to wait the full 5-day curing period before rehanging doors and drawers.
Here’s what separates DIY work from professional results: patience during reassembly. I carefully reinstall hardware after cleaning hinges thoroughly, add felt pads to prevent early chipping, and handle doors delicately to avoid smudging. During those essential first days, I avoid heavy use and wipe spills immediately. Proper planning is essential for achieving professional-quality results throughout the entire spray painting process.
Conclusion
I’ve walked you through the technical fundamentals—from proper surface prep and equipment selection to advanced spraying techniques and curing protocols. You’ll achieve professional-grade results by following these systematic procedures: maintaining consistent spray patterns, executing proper between-coat sanding, and adhering to manufacturer’s curing timelines. Your investment in quality tools and meticulous technique will deliver a durable, factory-like finish that transforms your kitchen cabinets into showroom-quality features.
References
- https://www.youtube.com/watch?v=tscF34we9QM
- https://www.lemonthistle.com/painting-kitchen-cabinets-with-a-sprayer/
- https://www.popularmechanics.com/home/interior-projects/a60307315/how-to-spray-paint-kitchen-cabinets/
- https://www.jennasuedesign.com/how-to-paint-cabinets-like-a-pro/
- https://www.youtube.com/watch?v=DPsBr_lVXQA
- https://www.youtube.com/watch?v=fLCTjSnBCno
- https://archedmanor.com/guide-to-the-best-paint-sprayers-for-painting-cabinets/
- https://www.nhance.com/virginiabeach/the-ultimate-guide-to-cabinet-painting-tools-and-techniques/
- https://www.lowes.com/n/how-to/how-to-paint-kitchen-cabinets
- https://www.bkciandre.com/how-to-spray-paint-kitchen-cabinets/