I’ve transformed dozens of attics into stunning bathroom retreats, and I’ll show you the exact techniques that work. The key lies in strategic placement of your fixtures under those sloped ceilings—positioning your soaking tub in the lowest section creates an intimate alcove while maximizing headroom where you need it most. With the right tools and systematic approach, you can tackle the unique challenges these spaces present. Here’s how I approach each conversion to achieve luxury results.
Key Takeaways
- Position bathtub under low ceiling points and place toilet where ceiling height peaks to maximize headroom and functionality.
- Install three-tier lighting with recessed LED spotlights, skylights, and full-height mirrors to enhance natural light reflection throughout the space.
- Create custom storage solutions including built-in drawers within knee walls and pull-out storage under slopes for efficient organization.
- Use white walls, glossy finishes, and large-format tiles extending across surfaces to create visual continuity and spaciousness.
- Design bespoke walk-in showers with custom glass enclosures and highlight exposed beams with contrasting colors for architectural interest.
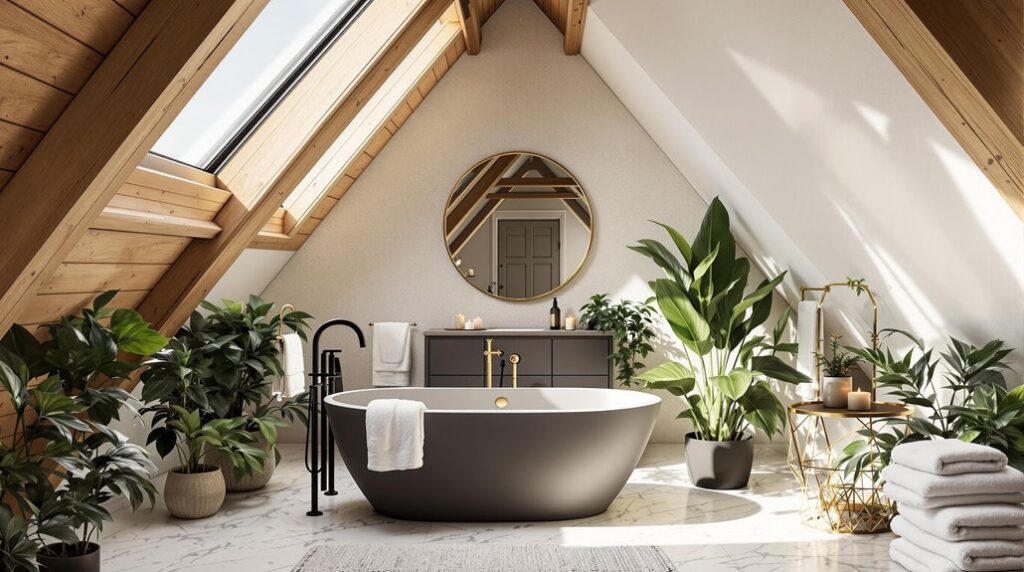
Maximizing Space Through Strategic Layout Design
When space constraints challenge traditional bathroom design, strategic layout planning transforms awkward loft angles into functional luxury. I’ll position your bathtub under the lowest ceiling points where standing isn’t required, maximizing usable headroom elsewhere. Your toilet and sink belong where ceiling height peaks, preventing uncomfortable stooping during daily routines. Adding custom storage solutions can further enhance the functionality of your loft bathroom, ensuring that everything you need is within reach without cluttering the space.
Custom shower enclosures that follow your attic’s unique angles create seamless integration while preserving precious headroom. I’ll arrange fixtures to establish clear pathways, eliminating obstructions that disrupt flow. Freestanding tubs positioned beneath windows capitalize on natural light and outdoor views, creating spa-like ambiance.
Strategic placement means centering key elements under roof curves for architectural harmony. Built-in benches along sloped walls add functionality without consuming floor space, while compact fixtures free up room for better circulation throughout your elevated retreat. Corner sinks maximize every square inch while maintaining the 21-inch clearance required in front of toilet fixtures for comfortable use.
Smart Storage Solutions for Sloped Ceilings
Because sloped ceilings create unique dead spaces that traditional storage can’t address, I’ll show you how custom-built solutions transform these architectural challenges into highly functional storage systems.
I recommend installing built-in drawers within knee walls using full-extension slides that access the entire depth. For awkward corner spaces, I’ll create stepped shelving that follows your ceiling’s slope, maximizing vertical storage while maintaining accessibility. A well-organized space can also enhance the overall aesthetic appeal, similar to innovative space-saving hacks used in utility rooms.
You’ll want to position recessed medicine cabinets and toiletry niches directly into knee walls, eliminating surface clutter. I use hinged panels in extremely low sections to reveal hidden compartments for seasonal items.
For pull-out storage, I install soft-close mechanisms on drawer systems that utilize every inch of space under your slope. These custom solutions turn architectural quirks into distinctive storage features. Consider incorporating rolling carts for flexible storage of bath linens and toiletries that can be easily moved and reorganized as your needs change.
Lighting and Color Strategies for Enhanced Brightness
Since loft bathrooms naturally suffer from reduced light penetration due to sloped ceilings and limited wall space, I’ll implement a three-tier lighting strategy that maximizes both natural and artificial illumination.
First, I’ll install recessed ceiling spotlights with dimmable LED lamps at the highest points, using hidden fixtures to maintain clean lines. Next, I’ll position LED floor lamps near vanities and install waterproof adjustable wall sconces above mirrors for task lighting.
For reflective enhancement, I’ll mount full-height mirrors on vertical walls and angle them to reflect skylights. Custom-cut mirrors following sloped ceiling lines create seamless integration. Incorporating biophilic design elements, such as plants, can also enhance the overall ambiance of the space.
My color palette features white walls with glossy finishes, light-colored tiles, and metallic fixture accents. I’ll install skylights at the peak and use clear glass shower enclosures for maximum light transmission. To achieve optimal functionality, I’ll position connection points strategically near vanity workstations and lighting fixtures for convenient access.
Selecting the Perfect Fixtures for Angled Spaces
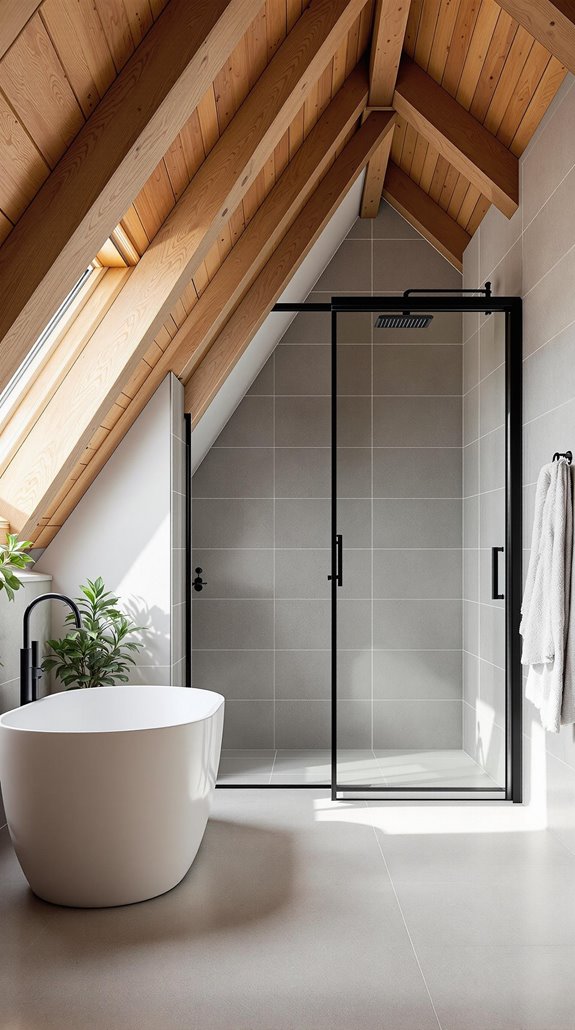
While standard bathroom fixtures rarely accommodate the unique geometry of loft spaces, I’ll select specialized components that transform angled limitations into design advantages. I’ll position soaking tubs directly under slopes where headroom restrictions create natural alcoves, then highlight them with bold tile patterns for dramatic impact. For vanities, I’ll design stepped configurations that decrease in depth toward the slope’s lowest point, utilizing floating installations with tapered sides to maintain visual openness.
I’ll create bespoke walk-in showers with custom glass enclosures following exact room angles, incorporating pentagon-shaped corner units for challenging layouts. Angular mirrored cabinets complement sloped ceilings while sliding doors prevent boxing in compact areas. I’ll install corner-oriented fixtures to free up central floor space, transforming awkward angles into stunning focal points. The walk-in shower configuration naturally increases the sense of space throughout the entire loft bathroom.
Bold Design Elements That Embrace Architectural Features
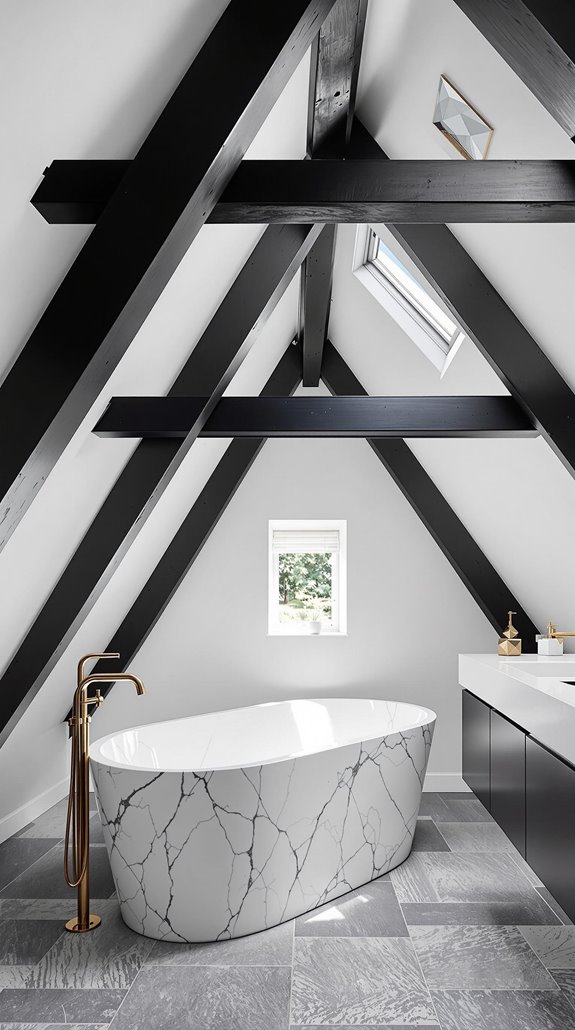
Once I’ve secured the right fixtures for angled layouts, I’ll amplify the loft’s architectural drama through bold design moves that celebrate rather than camouflage structural quirks. I’ll highlight exposed beams by painting them in contrasting colors or applying metal strapping for industrial flair. These structural elements become design anchors that I’ll frame around—positioning freestanding tubs between beams creates stunning focal points.
For material continuity, I’ll extend identical large-format tiles across floors, walls, and sloped ceilings to unify surfaces. I’ll vary tile patterns subtly—running horizontal on walls while following ceiling slopes. Custom glass showers that follow angular lines maximize headroom while creating seamless flow. Built-in benches beneath low ceilings provide functional seating, while recessed lighting preserves headroom and guarantees even illumination throughout these dramatic spaces. Incorporating natural light into the design can enhance the overall ambiance, making the loft feel more open and inviting. Floating cabinetry paired with illuminated mirrors creates modern elegance while maximizing floor space in compact loft bathrooms.
Technical Considerations for Attic Bathroom Conversions
Before I break ground on any attic bathroom conversion, I’ll navigate the complex web of building codes that govern these structural transformations. I need minimum 7-foot dimensions and 70 square feet of floor space to meet habitability standards. My structural engineer will evaluate load-bearing capacity—attic floors weren’t designed for water-filled fixtures and concentrated weight loads. Ensuring compliance with building regulations is crucial for maintaining structural integrity and safety during the conversion process.
I’ll position the bathroom above existing plumbing to minimize pipe extension costs. Waste lines require proper downward slope to connect with main stacks, and I can’t drill through ceiling joists—pipes run underneath instead. My staircase modifications must achieve 36-inch width with 9-inch tread depth.
Insulation becomes critical here. I’ll likely need rafter deepening to meet current energy codes, plus vapor barriers for humidity control. Dense blown-in insulation will provide essential noise reduction between floors, creating a more peaceful environment throughout the home. These technical hurdles separate successful conversions from costly mistakes.
Creating Luxurious Wet Room Designs Under Eaves
Since attic eaves represent the most challenging yet rewarding spaces for wet room conversions, I’ll transform these angled constraints into luxury assets through strategic design and precision installation.
I’ll position your shower along the longest wall, maximizing narrow dimensions for walk-in designs. Under lowest roof sections, I’ll install compact toilets and heated towel rails, preserving essential headroom. Using my circular saw, I’ll remove floorboards in shower zones, then install batons and plywood bases for structural integrity.
I’ll fit 22mm pre-formed shower decks, ensuring consistent gradients toward linear drains positioned discreetly against walls. Wall-mounted taps and waterfall shower heads maximize space efficiency while I’ll create marble ledges under eaves for toiletries. Frameless glass screens contain water without visual obstruction, completing your luxurious retreat. This loft wetroom conversion will significantly increase property value due to the high demand for multiple bathrooms in modern homes, making it a valuable home extension option.
Innovative Storage Integration in Compact Layouts
When transforming compact attic bathrooms, I’ll maximize every square inch through strategic storage integration that works with your eaves rather than against them.
I’ll install built-in cabinets along the eaves to capture every inch without encroaching on your floor space. These custom solutions fit perfectly under sloping ceilings while preserving headroom for daily use. Additionally, space-saving designs can help you optimize the layout further, ensuring functionality remains a priority.
For the bottom wall sections, I’ll recommend long, low-slung units that stretch the room’s length. You can join compact off-the-shelf units cost-effectively without interfering with skylights or natural light flow.
I’ll incorporate mirrored cabinet doors and drawer fronts to bounce light around your space, creating an illusion of expanded square footage while adding modern glamour.
Under-eaves storage with pull-out drawers transforms typically unused areas into functional compartments for toiletries and towels. I’ll also integrate bespoke shelves directly into tiled wall recesses to organize bathroom essentials without compromising your design aesthetic.
Transforming Challenging Angles Into Design Opportunities
Smart storage solutions work hand-in-hand with strategic fixture placement to turn your loft’s awkward angles into striking design features. I’ll position your showerhead at the ceiling’s highest point while installing wall-mounted fixtures along single walls in narrow 5’11” x 5’3″ layouts. You’ll maximize corner potential with neo-angle showers and triangular shelving that transforms dead spaces into functional assets. Understanding local building regulations is crucial to ensure that your loft conversion meets safety standards and enhances your home’s value.
I recommend floating vanities beneath slopes and freestanding tubs under apex windows for ideal light capture. Custom cabinetry matching your ceiling angles eliminates wasted space while recessed niches carved into sloped walls provide seamless storage. Wall-mounted taps positioned strategically near your basin will free up valuable counter space in these compact loft configurations. High-gloss finishes and continuous flooring patterns create visual flow, while angled tile layouts emphasize your loft’s architectural uniqueness rather than hiding it.
Conclusion
I’ve walked you through the essential technical aspects of converting your attic into a luxurious bathroom retreat. You’ll need proper structural assessment, upgraded plumbing rough-ins, and adequate ventilation systems before tackling the design elements. Focus on waterproofing membranes, proper sloping for drainage, and strategic fixture placement. With the right tools, materials, and planning, you’ll transform those challenging angles into stunning architectural features that’ll greatly boost your home’s value and functionality.
References
- https://www.livingetc.com/ideas/loft-bathroom-ideas
- https://www.granddesignsmagazine.com/bathroom/loft-bathroom-ideas/
- https://www.sanctuary-bathrooms.co.uk/journal/can-you-put-bathroom-your-loft-everything-you-need-know-about-loft-bathroom-conversion
- https://dakea.co.uk/articles/homeowner/11-attic-bathroom-ideas-for-your-loft-conversion/
- https://pl.pinterest.com/piotrszutkowski/ideas-for-the-attic-bathroom/
- https://www.blockrenovation.com/guides/attic-bathrooms-ideas-design-variables-block-renovation
- https://www.backsplash.com/attic-bathroom-ideas-creative-design-solutions-for-attics/
- https://www.houzz.com/discussions/6191999/layout-help-for-attic-bathroom
- https://www.homestyler.com/article/transforming-your-attic-bathroom
- https://www.youtube.com/watch?v=Gf-PhhVZtp4