I’ve transformed countless staircases over the years, and I’ll tell you that the difference between a mediocre paint job and a stunning makeover comes down to three critical factors: your primer selection, surface preparation technique, and the specific brush angles you use on those tricky baluster curves. Most homeowners skip the stain-blocking primer step entirely, which explains why their paint starts peeling within six months, but there’s a systematic approach that’ll give you professional-grade results every time.
Key Takeaways
- Gather essential tools including 4-inch rollers, detail brushes, stain-blocking primer, and specialized porch paint for high-traffic treads.
- Clean thoroughly with sugar soap, sand with 220-grit sandpaper, and apply appropriate primer based on surface material.
- Paint every other tread starting from the top, using fast-curing urethane-modified alkyd enamel for walkable pathways.
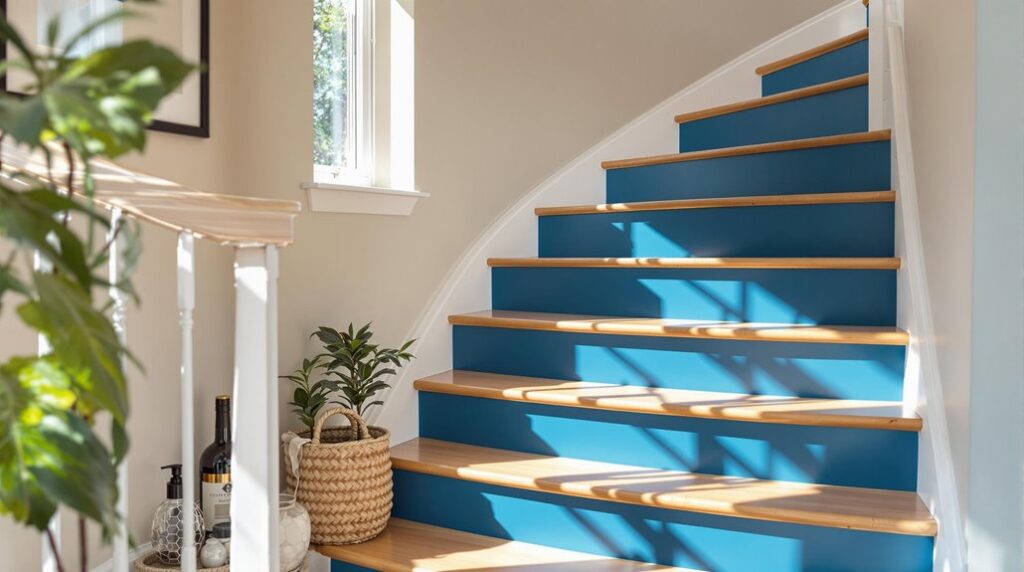
- Choose colors that complement your home’s flow and test samples in different lighting before finalizing decisions.
- Apply oil-based polyurethane protective finish in 2-3 coats with semi-gloss sheen for maximum durability and scratch resistance.
Essential Tools and Materials for Your Stair Painting Project
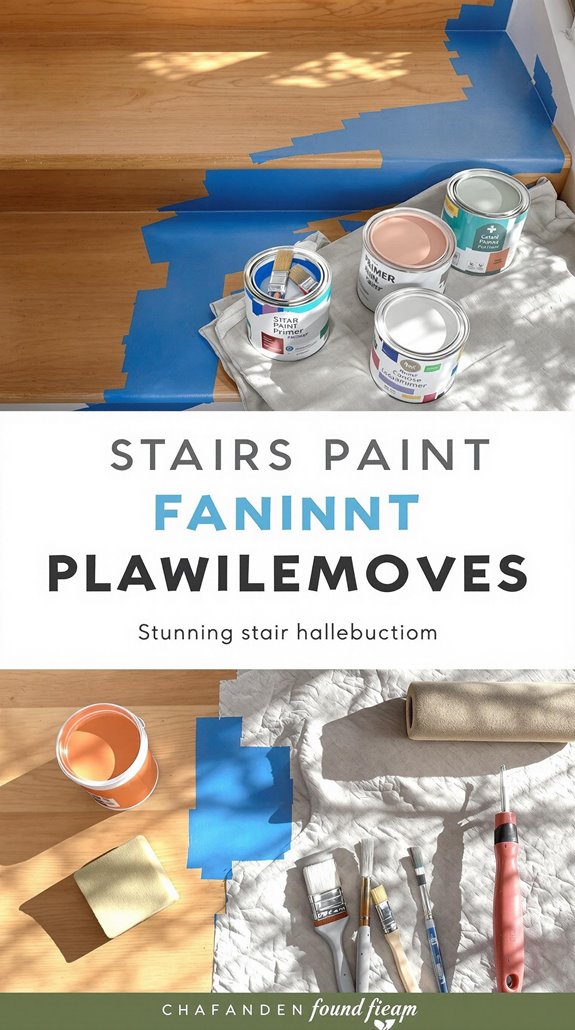
Success in stair painting hinges on assembling the right arsenal of tools and materials before you touch brush to surface. I’ll guide you through the essential equipment that transforms amateur attempts into professional-quality results.
Your brush collection needs both small detail brushes for cutting in around edges and large brushes for broad surfaces like handrails. A 4-inch roller with covers efficiently tackles treads and risers, while a quality paint tray distributes your chosen finish smoothly. Additionally, choosing the right plaster finish can enhance the overall aesthetic of your stairway and surrounding areas.
For primers and paints, I recommend stain-blocking primer paired with latex enamel for most applications, though oil-based paint delivers superior durability on high-traffic areas. Specialized porch paint works best for treads. Consider investing in Zinsser 123 primer for optimal adhesion and coverage on challenging surfaces.
Protection essentials include painter’s tape, drop cloths, and respiratory gear. Round out your kit with 220-grit sandpaper, sugar soap solution, and vacuum for thorough prep work.
Proper Cleaning and Surface Preparation Techniques
Three critical preparation steps determine whether your stair paint job achieves professional-grade adhesion and longevity. First, I’ll vacuum the entire staircase structure, then wash all surfaces with warm soapy water followed by sugar soap application. I’ll scrub with scouring pads for deep cleaning, rinse thoroughly, and allow complete drying.
Next, I’ll sand using 220-grit sandpaper for smooth finishes and 60-80 grit on high-wear areas. Sanding sponges work perfectly for intricate spindle details. I’ll vacuum between stages using microfiber cloths and finish with tack cloth.
Finally, I’ll scrape loose paint with putty knives, seal knots with spar varnish, and fill imperfections with wood filler. Once all surfaces are properly prepared, I’ll secure drop cloth around the base of the staircase before beginning the priming process. This methodical approach guarantees your primer bonds properly for lasting results.
Selecting the Right Primer for Different Stair Materials

Once you’ve completed the cleaning and sanding process, choosing the correct primer becomes the foundation for paint adhesion and durability. I’ll guide you through selecting primers for different stair materials.
For bare wood stairs, I recommend Benjamin Moore Fresh Start High-Hiding Primer, which provides excellent adhesion and covers major color changes effectively. When dealing with glossy pre-finished surfaces, you’ll need INSL-X STIX Waterborne Bonding Primer specifically designed for high-adhesion situations.
Laminate stairs require special attention since primer helps paint stick better to non-porous surfaces. Use a multi-surface primer formulated for laminate applications. For exterior stairs, choose weather-resistant primers matched to your specific material—wood, concrete, or metal, as proper materials can significantly enhance durability.
Interior stairs with existing non-glossy paint benefit from Zinsser 123 all-purpose primer, creating a solid foundation for your topcoat. Remember that worn wooden stairs may need sanding and wood filler application before priming to ensure the smoothest possible finish.
Strategic Painting Methods to Maintain Stair Access
When painting stairs, maintaining access while achieving professional results requires a systematic approach that prioritizes safety and functionality. I’ll start at the top step and work downward, painting every other tread to preserve walkable pathways during drying. You’ll want to tackle odd-numbered steps first, then even-numbered ones once they’re dry. It’s also essential to ensure the wood is prepared properly, as cleaning and sanding are critical steps in achieving a smooth finish.
I recommend using fast-curing urethane-modified alkyd enamel with high-density foam rollers for quick turnaround. Deploy drop cloths with non-slip backing and apply adhesive tread covers on unpainted steps for temporary traction. Install infrared heaters in well-ventilated spaces to accelerate drying while maintaining 50-70% humidity levels.
Establish clear signage and implement timed access windows every 15 minutes for necessary crossings, ensuring your household maintains safe navigation throughout the project. Use orbital sanders for flat step surfaces to achieve smooth, even results before painting.
Professional Techniques for Railings and Balusters
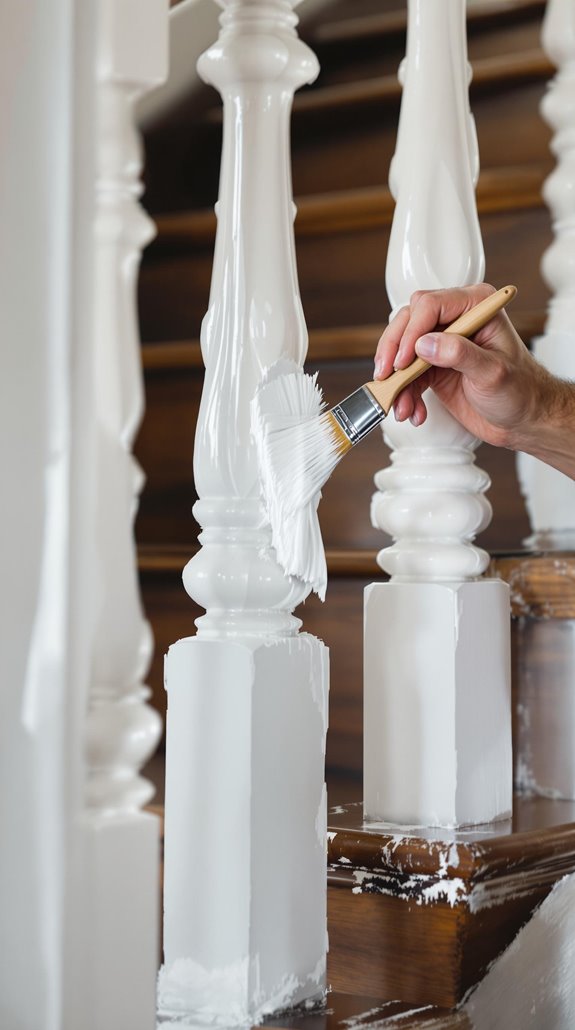
Master the art of railing and baluster painting by selecting the right tools for each surface type and complexity level. I’ll equip you with the professional techniques that transform amateur work into expert-quality results.
For spindles and intricate areas, I use angled detail brushes combined with 10mm microfibre mini rollers. This combination delivers 5x faster coverage than brushes alone. I apply the “cut-in” method first, working edges with minimal paint on bristles to prevent drips. Then I roll vertically downward, following wood grain patterns. To enhance the visual appeal of your staircase, consider adding stylish decor ideas that complement your new paint job.
For iron railings, I select rust-inhibiting primers and metal-specific paints after complete rust removal. Multiple thin coats beat single thick applications every time. I work systematically top-to-bottom, completing all brush work before switching tools. High-flow, quick-drying formulations enable same-day recoating for maximum efficiency. Always use hard enamel-type paint in satin or semi-gloss finish to ensure maximum durability against daily wear and tear.
Painting Adjacent Walls for a Complete Transformation
While stair painting transforms the focal point of your stairwell, adjacent wall preparation determines whether your project achieves professional-grade results or reveals amateur shortcuts.
I’ll remove handrails completely—this creates unhindered wall access and cleaner paint lines. After thorough cleaning and damage repair, I’ll apply painter’s tape for sharp color shifts. Incorporating different lighting options can also enhance the overall ambiance of your stairwell.
For elevated work, I’ll use extension pole rollers instead of ladders. The unstable footing in stairwells makes ladders dangerous. My adjustable angle rollers target corners efficiently while quality 2-3 inch brushes handle precise edge work.
I recommend two-tone applications with darker lower sections and lighter upper zones. Chair rail molding provides structural definition between colors. For contemporary drama, I’ll use full-wall accent colors in deep charcoal, working top-down to prevent drips.
Take time to understand your home’s flow before finalizing design decisions, as rushing into color choices immediately after moving can lead to regrettable outcomes.
Achieving Long-Lasting Results With Proper Curing
After completing your stair painting application, proper curing becomes the critical factor separating amateur results from professional-grade durability. I’ll guide you through the essential curing phases that guarantee your project withstands daily wear.
First, allow your primer 24-48 hours to cure completely before applying paint. Don’t rush this step—premature painting compromises adhesion. Between paint coats, respect manufacturer drying times to prevent lifting or uneven finishes.
For repair fillers, let them cure per manufacturer specifications before sanding flush with the surface. Wood fillers and concrete epoxy require different curing periods, so check your product labels. Remove painter’s tape immediately after applying the final coat to achieve clean, professional lines.
Final paint curing extends beyond surface drying—avoid heavy traffic for several days. Your patience during this phase determines whether your stairs maintain their professional appearance for years ahead.
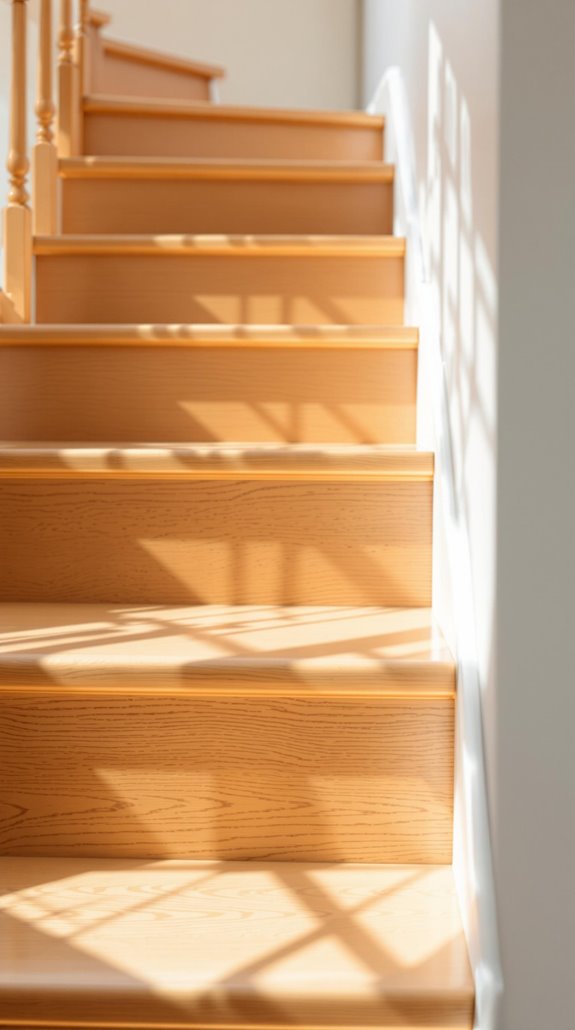
Protective Finishes for High-Traffic Durability
Once your paint has fully cured, selecting the right protective finish determines whether your stairs survive years of foot traffic or require frequent touch-ups. I recommend oil-based polyurethane for residential stairs—it deepens wood grain beautifully while providing maximum durability. You’ll need 2-3 coats with light sanding between applications, focusing on semi-gloss sheen for ideal scratch resistance. Additionally, maintaining air tightness in your home can enhance the longevity of your finishes by reducing moisture fluctuations.
For commercial settings, I’d choose 100% solid epoxy paste formulations that deliver years of slip resistance. The safety yellow or glow-in-dark options enhance visibility while eliminating frequent reapplication needs.
Professional-grade conversion varnish creates the hardest surface if you’ve got proper ventilation equipment. For eco-conscious homeowners, hardwax oil penetrates wood fibers naturally, though it requires more frequent maintenance than polyurethane in high-traffic zones. Water-based finishes offer faster drying times with minimal odor, making them perfect for occupied homes where you can’t afford extended downtime.
Conclusion
I’ve equipped you with the technical foundation for a professional stair transformation. Your success depends on proper tool selection, methodical surface prep, and strategic application techniques. Don’t skip the primer selection process or rush the curing phases—these determine your project’s longevity. Execute each step systematically, maintain consistent brush pressure, and apply protective topcoats for maximum durability. Follow these protocols, and you’ll achieve a flawless, high-traffic finish that’ll withstand years of use.
References
- https://www.thepaintpals.com/how-to-paint-a-stairway-a-comprehensive-guide/
- https://www.benjaminmoore.com/en-us/interior-exterior-paints-stains/how-to-advice/interiors/paint-stairs
- https://www.paintzen.com/advice/what-is-the-easiest-way-to-paint-stairs
- https://www.precisionpaintingplus.net/blog/how-to-prep-and-paint-stairs-in-3-steps/
- https://www.youtube.com/watch?v=CGA8xa5CxkU
- https://realcreativerealorganized.com/diy-painting-stairs/
- https://www.angi.com/articles/how-paint-stair-railing.htm
- https://www.valsparpaint.co.uk/how-to-guides/how-to-paint-stairs-spindles-and-bannisters/
- https://www.bhg.com/decorating/paint/techniques/how-to-paint-staircases-and-steps/
- https://ecospaints.net/blog/tips-for-painting-and-refinishing-your-staircase