I’ll show you how to transform ordinary timber into beautifully aged wood that looks like it’s weathered decades of British countryside exposure. You don’t need expensive antiquing products or professional tools – just common household items like tea, vinegar, and steel wool. The techniques I’m about to share will give your furniture and woodwork projects that coveted rustic patina that usually takes years to develop naturally. But first, let’s address the most essential step that determines whether your aging attempts look authentic or obviously artificial.
Key Takeaways
- Use concentrated black tea and steel wool soaked in white vinegar to create authentic grey-brown aging effects.
- Distress wood with chains, hammers, and wire brushing to achieve weathered texture and natural wear patterns.
- Apply iron acetate solution after tea treatment to trigger chemical reactions that develop vintage patina over 24 hours.
- Focus physical distressing on edges and corners where natural wear would occur, varying force and angles.
- Always use untreated wood and proper ventilation for safety when applying natural staining and distressing techniques.
Natural Darkening Techniques Using Tea and Vinegar Solutions
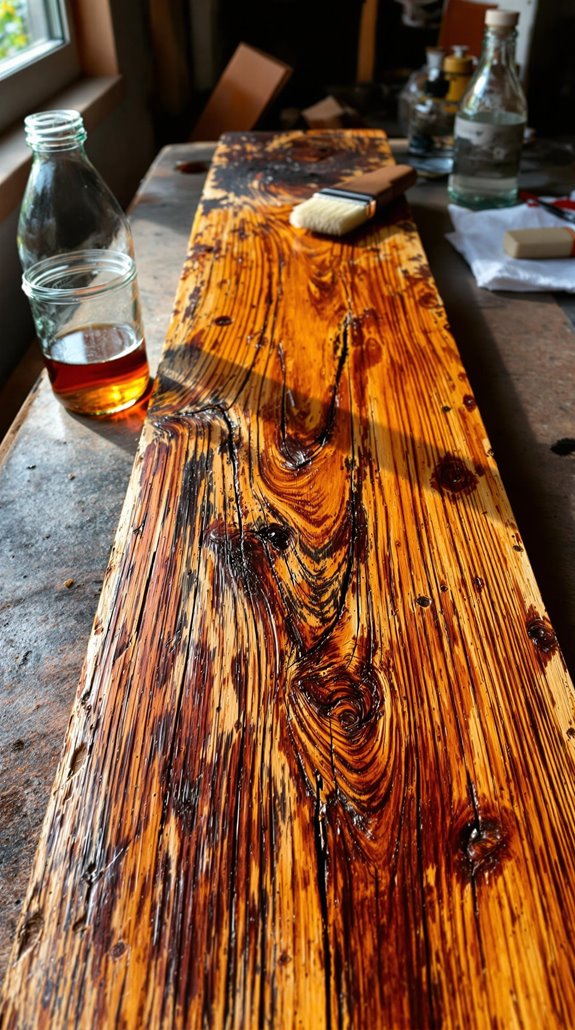
When you’re looking to age wood naturally without harsh chemicals, tea and vinegar solutions create authentic-looking patinas through a simple chemical reaction. I’ll show you how tannins from tea bond with iron ions from a vinegar-steel wool mixture to mimic decades of natural aging within hours.
First, I brew concentrated black tea using 3-4 bags per cup of boiling water. For stronger results, I add coffee grounds or red wine to boost tannin content. Meanwhile, I soak #0000 steel wool in white vinegar for at least 24 hours until it dissolves into a murky iron acetate solution.
I apply the cooled tea solution first, letting it dry completely before brushing on the iron acetate. The instant color transformation creates authentic grey-brown tones that’ll impress fellow DIY enthusiasts. This natural method allows the wood grain to show through beautifully, unlike paint which creates surface layers that can chip or peel over time.
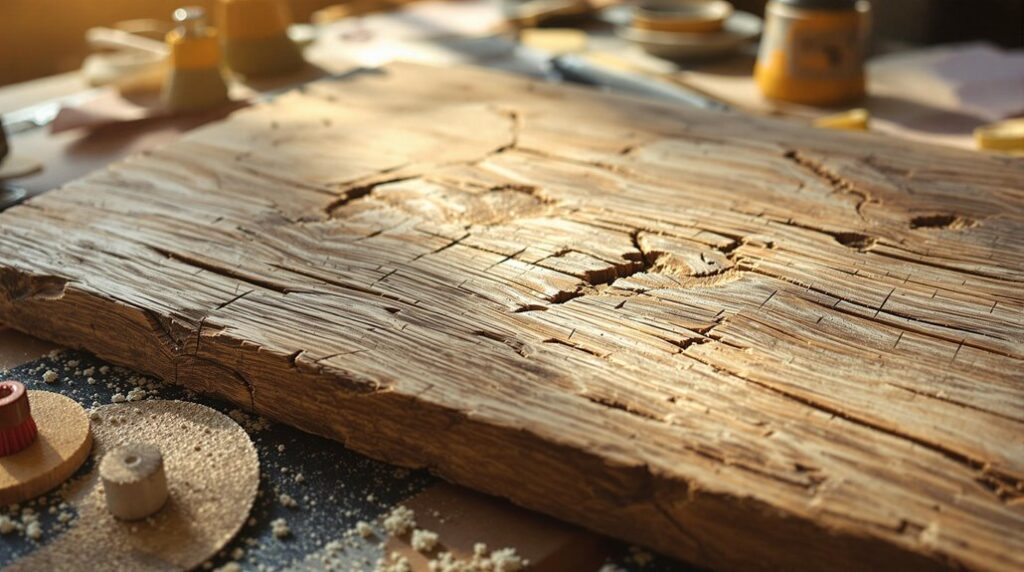
Physical Distressing Methods for Authentic Weathered Texture
The key to convincing wood aging lies in replicating the physical damage that occurs naturally over decades of use and exposure. I’ll start with impact-based distressing—striking wood with chains, hammers, or screwdrivers creates authentic dents and dings. Focus on edges where real wear occurs, varying your force and angles to avoid repetitive patterns.
Wire brushing against the grain removes softer wood layers, exposing beautiful texture that mimics weathering. I combine this with coarse-grit sandpaper (60-80 grit) on corners and high-contact areas, using random orbital sanders for haphazard results.
For layered authenticity, I apply wax to edges before painting, then sand selectively to reveal underlying colors. This technique, combined with varied pressure and duration, creates the uneven surfaces that make aged wood so compelling. To enhance this weathered appearance, I create faux wormholes by randomly poking tiny holes with a nail or awl, varying their depth and size for maximum authenticity.
Accelerated Oxidation Process for Vintage Patina Effects

While physical distressing creates surface texture, chemical oxidation produces the deep, authentic patina that separates convincing aged wood from obvious fakes. I’ll show you how to achieve this weathered look using simple household materials.
My go-to method involves soaking steel wool in white vinegar for 24 hours, creating iron acetate that reacts with wood tannins. This technique aligns with essential steps for achieving a cost-effective home improvement project. High-tannin woods like oak darken beautifully within hours, while pine needs pre-treatment with strong black tea to boost tannin content.
For controlled results, I dilute the solution 1:1 with water for lighter effects or use it full-strength for dramatic charcoal tones. The magic happens as the chemical reaction develops over 24 hours, creating that coveted vintage patina you’re after. Always test stain colors on scrap wood first to ensure you achieve the desired aged appearance before applying to your main project.
Staining and Finishing Applications for Rustic Appeal
After creating the perfect oxidized base, I’ll show you how strategic staining and finishing transforms your chemically-aged wood into convincingly rustic pieces.
I start with natural staining agents like strong black tea, brushing it onto the wood for authentic darkening effects. The tea reacts with wood tannins, creating that aged appearance we’re after. Affordable DIY shelving solutions can also benefit from these rustic finishes, adding character to functional pieces. I’ll apply multiple coats to deepen the color gradually.
Next, I apply glaze coats to enhance grain visibility, then dry-brush paint lightly for weathered texture. I focus along grain lines for authenticity, letting each layer dry 1-2 hours. For enhanced authenticity, I test stain colors on spare boards first to ensure the perfect tone before committing to the entire piece.
For protection, I seal with grey wax using a lint-free rag, buffing immediately for a smooth finish. Finally, I apply hemp oil, letting it soak 12 hours before buffing excess.
Safety Considerations and Material Selection for Best Results
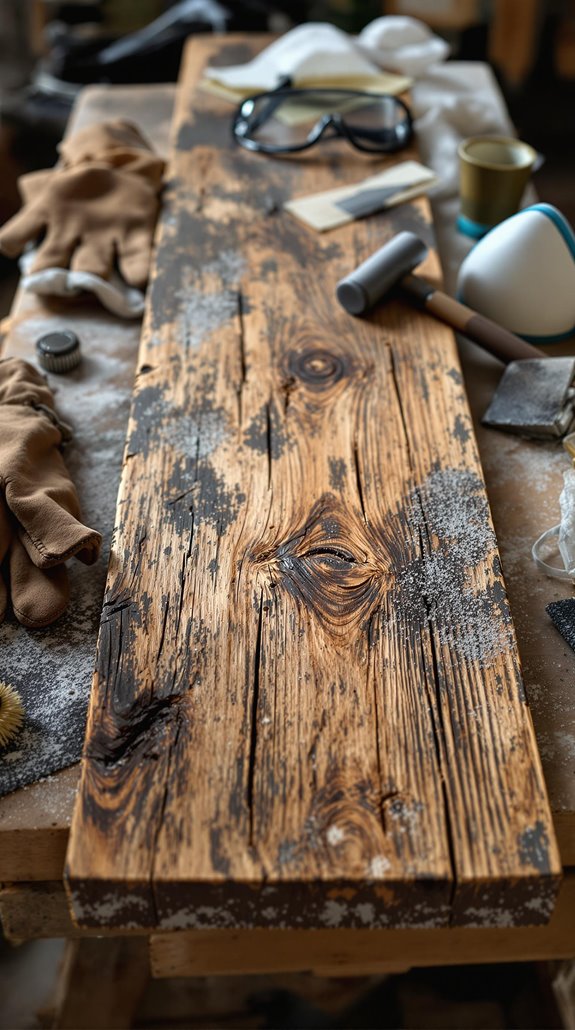
Working with wood aging techniques requires serious attention to safety hazards that can affect your health long after the project’s complete. I always prioritize selecting untreated wood to avoid preservative-related health risks that can damage your central nervous system and cause dermatitis. When working with any wood, I use proper dust extraction since wood dust increases asthma risk greatly—carpenters face four times higher likelihood of developing respiratory issues. Furthermore, ignoring early signs of damp in your home can lead to mold growth, which poses additional health risks.
I recommend investing in quality respiratory protection and ensuring adequate ventilation in your workspace. Never dry sweep wood dust; instead, use appropriate vacuum systems. For confined spaces or when using chemical aging products, breathing apparatus becomes essential. Remember to provide proper washing facilities and maintain clean work clothes separately. Your safety isn’t negotiable—these precautions protect you while achieving those perfect rustic results we’re after.
Consider ordering pre-cut materials when possible to significantly reduce the amount of dust generated during your aging project.
Conclusion
I’ve shown you proven methods to transform new wood into authentic-looking aged timber. You’ll get the best results by combining tea staining with iron acetate solutions, then adding physical distressing for texture. Don’t skip the protective finish—it’s essential for durability. Remember to work in ventilated areas and wear gloves when handling chemicals. With these techniques, you’ll create convincing rustic charm that’ll fool anyone into thinking your wood’s genuinely weathered by time.
References
- https://organicnaturalpaint.co.uk/blogs/darkening-wood-naturally-diy-methods-vs-commercial-natural-wood-finishes/
- https://www.younghouselove.com/how-to-distress-wood/comment-page-7/
- https://www.jennasuedesign.com/diy-aged-wood-technique/
- https://www.youtube.com/watch?v=1lMwlYAKMfQ
- https://gadgetsandgrain.com/2019/08/02/how-to-oxidize-age-wood-in-a-matter-of-minutes/
- https://blueteatile.com/staining-wood-naturally/
- https://mountainmodernlife.com/how-to-make-new-wood-look-old/
- https://www.js2partners.com/post/how-to-distress-wood-diy
- https://wellnessmama.com/natural-home/distress-wood/
- https://www.thediygirl.com/aging-wood-tea-vinegar-steel-wool/